
9th Jul 2026
How To Test A Jet Ski Starter Solenoid: A Step-By-Step Guide
You press the start button, but instead of your engine turning over, you're greeted with nothing—or perhaps just a single click.
Before assuming your starter motor has failed, it's worth checking the starter solenoid.
The starter solenoid is one of the most common causes of starting problems on Sea-Doo, Yamaha and Kawasaki jet skis. Fortunately, it's also one of the easiest components to test.
In this guide, we'll show you how to diagnose a faulty starter solenoid safely and determine whether it's time for a replacement.
What Does A Starter Solenoid Do?
The starter solenoid acts as a heavy-duty electrical switch.
When you press the start button, a small electrical signal activates the solenoid, which then connects battery power directly to the starter motor.
Without a functioning solenoid, the starter motor won't receive enough current to crank the engine.
Common Symptoms Of A Faulty Starter Solenoid
A failing starter solenoid can cause several different problems, including:
-
Clicking when pressing the start button
-
Engine won't crank
-
Intermittent starting problems
-
Starter motor doesn't engage
-
Complete loss of starting power
These symptoms can also be caused by a weak battery or faulty starter motor, so testing is important before replacing parts.
Tools You'll Need
Before you begin, gather the following:
-
Digital multimeter
-
Basic socket set
-
Insulated screwdriver (for testing only)
-
Safety glasses
-
Gloves
Always work in a well-ventilated area with the ignition switched off before disconnecting any electrical components.
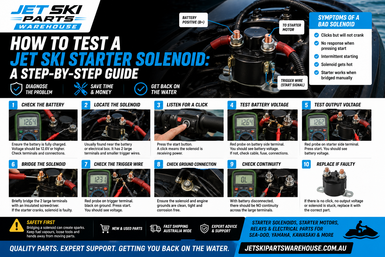
Step 1: Check The Battery
Many starter problems are caused by low battery voltage rather than a faulty solenoid.
Using a multimeter:
-
Battery at rest should generally read around 12.6V when fully charged.
-
While cranking, the voltage should not drop excessively.
If the battery is weak, charge or replace it before continuing with further testing.
Step 2: Locate The Starter Solenoid
The starter solenoid is usually positioned close to the battery.
It has:
-
Two large terminals carrying battery current
-
One or two smaller control wires
-
Heavy battery cables connected to each side
Inspect the terminals for:
-
Corrosion
-
Loose nuts
-
Burn marks
-
Damaged wiring
Sometimes cleaning the connections is all that's required.
Step 3: Listen For The Click
Reconnect the battery if disconnected.
Press the start button while listening carefully.
You hear a click
The control circuit is working, but the solenoid contacts or starter motor may have a problem.
No click
The issue may involve:
-
Safety lanyard
-
Start button
-
Blown fuse
-
Wiring
-
Relay circuit
-
Faulty solenoid coil
Step 4: Test Voltage At The Control Terminal
Using a multimeter:
-
Place the negative probe on a good earth.
-
Place the positive probe on the small control terminal.
-
Press the start button.
If battery voltage is present when pressing the button, the control circuit is working correctly.
If there's no voltage, the fault is likely elsewhere.
Step 5: Test The Output Side
Next, test the large terminal leading to the starter motor.
Press the start button while measuring voltage.
If the input side has battery voltage but the output side does not, the internal contacts inside the solenoid have likely failed.
Step 6: Perform A Bypass Test (With Extreme Care)
Only perform this test if you're confident working around high-current electrical systems.
Using an insulated screwdriver, briefly bridge the two large terminals on the solenoid.
If the starter motor immediately cranks the engine:
-
Battery is likely good.
-
Starter motor is likely good.
-
The starter solenoid is the most likely cause.
Avoid prolonged contact, as this will create sparks.
When The Problem Isn't The Solenoid
If the solenoid passes all tests, inspect other common causes such as:
-
Flat battery
-
Faulty starter motor
-
Damaged starter gear
-
Blown fuse
-
Poor earth connection
-
Corroded battery terminals
-
Faulty safety lanyard
-
ECU or wiring issues
A systematic diagnosis helps prevent replacing good parts unnecessarily.
Prevent Starter Problems
To extend the life of your starting system:
-
Keep battery terminals clean and tight.
-
Flush your jet ski after every saltwater ride.
-
Apply dielectric grease to electrical connectors.
-
Replace weak batteries promptly.
-
Inspect wiring annually for corrosion or damage.
Regular maintenance can prevent many electrical faults before they occur.
Need A Replacement Starter Solenoid?
At Jet Ski Parts Warehouse, we stock a wide range of starter solenoids for Sea-Doo, Yamaha and Kawasaki jet skis, along with:
-
Starter motors
-
Starter drives
-
Starter gears
-
Batteries
-
Ignition components
-
Genuine OEM parts
-
Premium aftermarket replacements
If you're unsure which starter solenoid suits your model, our team is happy to help you find the correct replacement.
Final Thoughts
A faulty starter solenoid is one of the most common reasons a jet ski won't crank, but it's also one of the easiest components to test.
By following a logical troubleshooting process, you can quickly determine whether the issue lies with the solenoid, battery, starter motor or another part of the starting system.
Spending a few minutes diagnosing the problem can save you both time and money—and get you back on the water sooner.