
16th Sep 2026
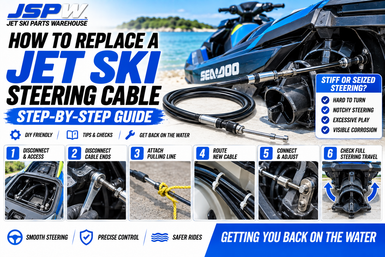
How To Replace Steering Cables On A Jet Ski: Step-By-Step Guide
If your jet ski's handlebars have become stiff, notchy or increasingly difficult to turn, the steering cable may be reaching the end of its life.
Steering cables spend years operating in a wet, salty environment. Eventually, corrosion and wear can develop inside the cable, increasing resistance until the cable becomes difficult—or sometimes impossible—to move.
Replacing a steering cable is achievable for a competent DIY mechanic, but correct routing and adjustment are critical.
Whether you own a Sea-Doo, Yamaha or Kawasaki, here's what you need to know before replacing your jet ski steering cable.
What Does A Jet Ski Steering Cable Do?
The steering cable connects the handlebars to the steering nozzle at the rear of the jet pump.
When you turn the handlebars, the cable transfers that movement to the nozzle.
The nozzle redirects jet-pump thrust to steer the ski.
A typical system includes:
-
Handlebars
-
Steering column
-
Steering linkage
-
Steering cable
-
Cable mounting hardware
-
Steering nozzle
-
Nozzle pivots and bushes
If the cable begins binding internally, you'll feel the additional resistance through the handlebars.
Signs Your Steering Cable Needs Replacing
1. Handlebars Are Hard To Turn
This is one of the most common symptoms.
Steering may gradually become heavier until considerable force is required to move the handlebars.
Don't ignore it.
Steering should operate smoothly without excessive resistance.
2. Steering Feels Notchy
A damaged or internally corroded cable may feel rough rather than simply heavy.
You might feel:
-
Sticking
-
Notches
-
Uneven resistance
-
Tight spots
This can indicate deterioration inside the cable.
3. Steering Cable Is Seized
Eventually, a badly corroded cable may stop moving altogether.
Don't try to solve a seized cable by applying excessive force to the handlebars.
You could damage:
-
Steering column
-
Linkages
-
Cable mounting points
-
Steering nozzle
Find the source of the restriction first.
4. Visible Cable Damage
Inspect accessible sections of the cable for:
-
Cracked outer casing
-
Corrosion
-
Kinks
-
Bent sections
-
Damaged ends
-
Broken mounting hardware
Physical damage is a good reason to replace the cable.
5. Excessive Steering Play
Not every failing steering system becomes stiff.
Excessive free play can indicate wear in:
-
Cable ends
-
Steering linkage
-
Nozzle bushes
-
Steering column
-
Mounting hardware
Inspect the entire system before ordering parts.
Make Sure The Cable Is Actually The Problem
Before replacing it, isolate the source of the stiffness.
With the engine switched off and safety lanyard removed, operate the handlebars slowly.
Watch the steering nozzle.
If appropriate for your model and you're comfortable following the workshop procedure, disconnect the steering cable from the nozzle.
Nozzle Moves Freely With Cable Disconnected
The steering cable or front steering mechanism becomes the likely problem.
Cable Moves Freely But Nozzle Is Stiff
Inspect:
-
Nozzle pivots
-
Bushes
-
Reverse components
-
Corrosion
Steering Is Still Stiff With Cable Disconnected At The Rear
The problem may be inside the cable or front steering mechanism.
Diagnosis before dismantling can save considerable time.
Get The Correct Replacement Cable
Steering cables are not universal.
Even similar-looking models can use different:
-
Overall cable lengths
-
End fittings
-
Thread sizes
-
Mounting arrangements
-
Adjustment ranges
When ordering, identify your:
Make + Model + Year
Where possible, cross-reference the original OEM part number.
Don't choose a steering cable purely because the overall length looks approximately correct.
Tools You May Need
Requirements vary between models, but commonly used tools include:
-
Socket set
-
Spanners
-
Screwdrivers
-
Pliers
-
Cable ties
-
Tape
-
Torque wrench
-
Suitable marine lubricant where specified
-
Replacement steering cable
A workshop manual for your exact model is strongly recommended.
Step 1: Secure The Jet Ski
Place the ski securely on its trailer or workshop stand.
Before starting:
-
Remove the safety lanyard.
-
Switch the ignition off.
-
Disconnect the battery if required for the work being performed.
Never work around the jet pump while the engine can accidentally start.
Step 2: Centre The Steering
Position the handlebars and steering nozzle approximately straight ahead.
Before disconnecting anything, take photos of:
-
Cable routing
-
Adjustment position
-
Retaining hardware
-
Nozzle connection
-
Front steering connection
These provide a useful reference during reassembly.
Step 3: Gain Access To The Front Cable Connection
Depending on the model, you may need to remove:
-
Front storage compartment
-
Steering covers
-
Handlebar covers
-
Access panels
-
Other trim components
Locate where the steering cable attaches to the steering mechanism.
Take care with plastic clips and older trim pieces, which can become brittle with age.
Step 4: Disconnect The Cable At The Steering Nozzle
Move to the rear of the ski.
Locate the steering cable connection at the steering nozzle.
Depending on the model, it may use:
-
Nut
-
Bolt
-
Pin
-
Clip
-
Ball-joint style connection
Remove the retaining hardware carefully.
Keep washers, spacers and clips organised in their original order.
Step 5: Disconnect The Cable At The Front
Disconnect the cable from the steering mechanism.
Again, note the position of:
-
Nuts
-
Washers
-
Spacers
-
Adjustment hardware
Don't alter adjustment nuts unnecessarily until you've recorded their original position.
Step 6: Release Cable Retainers
The steering cable will normally be secured at several points through the hull.
Remove or release:
-
Cable clamps
-
Retaining brackets
-
Cable ties
-
Sealing hardware
Don't simply pull the cable out yet.
You need to know exactly how the replacement will be routed.
Step 7: Attach A Pulling Line
This can make installation considerably easier.
Before removing the old cable, securely attach a strong cord or pulling line to one end.
As the old cable is pulled through the hull, the line follows it.
You can then use the line to guide the replacement cable through the same route.
Make the connection smooth so it doesn't catch inside the hull.
Step 8: Remove The Old Steering Cable
Carefully pull the cable through the hull.
Avoid forcing it.
If it becomes stuck:
-
Stop
-
Find where it's catching
-
Check for another retaining clip or bracket
Pulling aggressively can damage wiring, hoses or internal fittings.
Once removed, compare the old and new cables.
Step 9: Compare The Replacement
Before installation, confirm:
-
Overall length
-
Outer cable length
-
End fittings
-
Thread sizes
-
Mounting points
-
Adjustment range
If something doesn't match, stop before installing it.
It's much easier to identify the wrong cable now than after routing it through the entire ski.
Step 10: Route The New Cable
Attach the replacement cable to your pulling line and carefully guide it through the hull.
Follow the original factory routing.
Make sure the cable doesn't:
-
Rub against the driveshaft
-
Contact hot exhaust components
-
Interfere with throttle controls
-
Contact moving components
-
Become sharply kinked
-
Become trapped underneath other components
Smooth routing is critical for light steering and long cable life.
Step 11: Secure The Cable
Reinstall the original:
-
Cable retainers
-
Brackets
-
Clamps
-
Sealing components
Where the cable passes through the hull, make sure the sealing arrangement is installed correctly.
A poorly sealed cable fitting can potentially allow water into the hull.
Step 12: Connect The Front Steering Mechanism
Attach the cable to the handlebars/steering mechanism.
Install all hardware in its original orientation.
Don't fully adjust the steering yet.
Step 13: Connect The Steering Nozzle
Attach the rear cable end to the steering nozzle.
Make sure:
-
Hardware is correctly installed
-
Retaining clips are secure
-
Cable isn't twisted
-
Nozzle moves freely
Move the handlebars gently through their range.
Step 14: Centre The Steering
With the handlebars centred, inspect the steering nozzle.
It should point in the correct straight-ahead position according to the manufacturer's specification.
If it doesn't, the cable adjustment needs to be corrected.
Step 15: Adjust The Steering Cable
Adjustment procedures vary between models.
Typically, adjustment involves changing the position of threaded cable ends or adjustment nuts.
The goal is to achieve:
-
Centred handlebars
-
Correct nozzle position
-
Equal steering travel
-
Full movement in both directions
Don't simply adjust it by eye if the workshop manual provides a measurement or alignment specification.
Step 16: Check Full Steering Travel
Slowly turn the handlebars from full left to full right.
Check that:
-
Movement is smooth
-
No cable binding occurs
-
Nozzle reaches the correct travel
-
Cable doesn't stretch or pull excessively
-
Nothing contacts the reverse system
The steering shouldn't become noticeably tighter at either end of its travel.
Step 17: Check Reverse / iBR / RiDE Components
The steering nozzle operates close to the reverse system on many modern jet skis.
After replacing the cable, check that the steering doesn't interfere with:
-
Reverse bucket
-
Sea-Doo iBR
-
Yamaha RiDE
-
Reverse linkages
Everything should operate through its intended range without contact or binding.
Step 18: Reassemble The Ski
Reinstall all:
-
Steering covers
-
Storage compartments
-
Access panels
-
Trim components
Before finishing, inspect the engine compartment and make sure no tools, nuts or cable ties have been left inside.
Step 19: Perform A Final Safety Check
Before launching:
-
Turn handlebars fully left and right.
-
Confirm nozzle movement.
-
Check all retaining hardware.
-
Confirm cable routing.
-
Check through-hull sealing.
-
Verify reverse operation.
-
Confirm nothing binds.
Steering is a safety-critical system.
Don't skip the final inspection.
Step 20: Water Test Carefully
Your first ride should be a controlled test.
Start at low speed.
Check:
-
Steering response
-
Handlebar position
-
Straight-line tracking
-
Left and right steering
-
Reverse operation
Gradually increase speed only after confirming everything operates correctly.
If the ski pulls strongly to one side, return to shore and check the adjustment.
Should You Lubricate A Steering Cable?
Don't automatically inject grease or oil inside a sealed steering cable.
Many modern cables aren't designed to be internally lubricated.
Where lubrication is specified, use the correct product and procedure for your model.
You can also inspect and lubricate appropriate external:
-
Pivot points
-
Cable ends
-
Steering linkages
—but only where the manufacturer specifies.
Why Do Jet Ski Steering Cables Fail?
Common causes include:
-
Saltwater corrosion
-
Water intrusion
-
Age
-
Damaged outer casing
-
Incorrect routing
-
Tight bends
-
Lack of appropriate maintenance
-
Physical damage
Saltwater skis are particularly vulnerable.
How To Make Your New Steering Cable Last Longer
After saltwater riding:
-
Rinse the steering nozzle.
-
Rinse exposed cable ends.
-
Remove salt deposits.
-
Inspect the cable periodically.
-
Keep nozzle pivots clean.
-
Apply corrosion protection where appropriate.
Most importantly, don't ignore steering that gradually becomes heavier.
Catching corrosion early can prevent damage to surrounding components.
Don't Force Stiff Steering
If your handlebars suddenly become difficult to turn, forcing them isn't the solution.
Excessive force can damage:
-
Steering mechanism
-
Cable ends
-
Mounting brackets
-
Steering nozzle
Find the component that's binding.
Quick Steering Cable Replacement Checklist
Before launching after replacement:
-
Correct cable installed
-
Factory routing followed
-
Cable securely retained
-
Through-hull fitting sealed
-
Front connection secure
-
Rear connection secure
-
Handlebars centred
-
Nozzle correctly aligned
-
Full left/right movement
-
Reverse system clear
-
No binding
-
All hardware checked
A few extra minutes checking the installation is worthwhile when you're working on a safety-critical system.
Need A Replacement Jet Ski Steering Cable?
Jet Ski Parts Warehouse stocks steering components for a wide range of Sea-Doo, Yamaha and Kawasaki jet skis, including:
-
Steering cables
-
Steering nozzles
-
Steering columns
-
Steering linkages
-
Cable hardware
-
Bushes
-
Reverse components
-
Sea-Doo iBR parts
-
Yamaha RiDE components
-
Sponsons
-
Genuine OEM parts
-
Premium aftermarket replacement parts
-
Quality used OEM components
If you're unsure which steering cable fits your jet ski, contact JSPW with your make, model, year and OEM part number where available, and we'll help identify the correct replacement.
Final Thoughts
Replacing a jet ski steering cable is mostly about careful removal, correct routing and accurate adjustment.
The most useful trick is to attach a pulling line before removing the old cable. This gives you a route to guide the replacement through the hull without guessing where it originally ran.
Once installed, don't consider the job complete until the handlebars and steering nozzle are correctly centred and you've verified full movement in both directions.
Take your time, check the hardware and perform the first water test carefully.
Correctly installed steering should feel smooth, predictable and responsive—exactly what you need when you're back on the water.