
26th Aug 2026
How To Replace A Jet Ski Carbon Ring: A Step-By-Step Guide
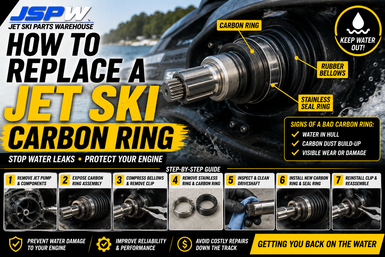
If you own a Sea-Doo and you're finding excessive water inside the hull, noticing black carbon dust around the driveshaft area or hearing unusual noises from the driveline, the carbon ring may need attention.
The carbon ring forms part of the driveshaft sealing system used on many Sea-Doo models. Its job is simple but extremely important: keep water outside the hull while allowing the driveshaft to rotate at high speed.
When the carbon ring or its related components wear, the seal can begin leaking and, if ignored, potentially allow a significant amount of water into the hull.
Here's what the carbon ring does, the warning signs to look for and the basic process involved in replacing it.
What Is A Sea-Doo Carbon Ring?
Unlike many Yamaha and Kawasaki jet skis that use different driveshaft sealing arrangements, numerous Sea-Doo models use a carbon-ring system.
The main components typically include:
-
Carbon ring
-
Stainless steel support/sealing ring
-
Rubber bellows
-
Driveshaft
-
Retaining clip or C-clip
-
O-rings
-
Related seals and hardware
The rubber bellows applies pressure to the carbon ring, pushing its sealing face against the stainless ring on the driveshaft.
These two surfaces create the seal that helps prevent water entering around the driveshaft.
Signs Your Carbon Ring May Need Replacing
A worn carbon ring doesn't always fail suddenly.
Watch for these warning signs.
1. Water Entering The Hull
This is the biggest warning sign.
A small amount of water inside a PWC hull can have several causes, but if water is entering around the driveshaft area, the carbon seal system should be inspected.
Don't simply keep draining the hull.
Find the source of the leak.
2. Excessive Carbon Dust
Some black carbon residue around the seal area can occur as the carbon ring wears.
However, excessive black dust may indicate abnormal wear.
Look around:
-
Carbon ring
-
Bellows
-
Driveshaft
-
Stainless sealing ring
Heavy deposits deserve further inspection.
3. Visible Damage To The Carbon Ring
Inspect the sealing surface for:
-
Chips
-
Cracks
-
Uneven wear
-
Excessive scoring
-
Damaged edges
A damaged sealing face may no longer maintain a reliable seal.
4. Damaged Rubber Bellows
The carbon ring depends on the bellows maintaining the correct pressure against the stainless sealing surface.
Over time, the bellows can:
-
Harden
-
Crack
-
Lose tension
-
Become damaged
-
Deteriorate from age
A perfectly good carbon ring may still leak if the bellows isn't applying sufficient pressure.
5. Damaged Stainless Steel Ring
The stainless ring that contacts the carbon ring must also be in good condition.
Check it for:
-
Grooves
-
Corrosion
-
Pitting
-
Uneven wear
-
Damaged sealing surface
Replacing only the carbon ring while reusing a badly damaged mating surface may not solve the leak.
Should You Replace The Complete Carbon Ring Kit?
In many cases, this makes sense.
If you're already dismantling the driveshaft sealing system, inspect all related components.
Depending on your particular Sea-Doo, a replacement kit may include:
-
Carbon ring
-
Stainless steel ring
-
Bellows
-
O-rings
-
Retaining clip
-
Clamps
Replacing worn components together can help avoid having to repeat the entire job shortly afterwards.
Tools You May Need
The exact tools vary between Sea-Doo models, but commonly required equipment includes:
-
Socket and spanner set
-
Pliers
-
Screwdrivers
-
Driveshaft or pump tools where applicable
-
Marine grease
-
Torque wrench
-
Replacement carbon ring kit
-
Workshop manual for your specific model
Some models require considerably more disassembly than others.
Always check the correct procedure for your exact year and model before starting.
Step 1: Prepare The Jet Ski
Place the Sea-Doo securely on its trailer or workshop stand.
Before working:
-
Remove the safety lanyard
-
Disconnect the battery
-
Ensure the engine can't accidentally start
-
Allow the engine and exhaust to cool
You'll be working around the driveshaft and driveline, so accidental engine operation could cause serious injury.
Step 2: Remove Components Required For Driveshaft Access
Depending on the Sea-Doo model, gaining enough movement in the driveshaft may require removing the jet pump and other components.
The exact procedure varies significantly between generations.
You may need to disconnect or remove:
-
Steering linkage
-
Reverse/iBR components
-
Jet pump
-
Driveshaft-related components
Take photos during disassembly if necessary so everything returns to its original position.
Step 3: Expose The Carbon Ring Assembly
Once you have sufficient access, locate the carbon ring around the driveshaft inside the hull.
You'll typically see the carbon ring positioned against the stainless sealing ring with the rubber bellows behind it.
Before dismantling anything, inspect the complete assembly.
Look for obvious signs of:
-
Carbon dust
-
Water tracks
-
Corrosion
-
Cracked bellows
-
Damaged clamps
These clues can help confirm where the leak originated.
Step 4: Compress The Bellows
The stainless ring is commonly held in position on the driveshaft by a retaining clip.
To access it, the bellows/carbon ring assembly generally needs to be compressed away from the stainless ring.
This exposes the retaining hardware.
Be careful not to damage the bellows or sealing surfaces.
Step 5: Remove The Retaining Clip
Once accessible, carefully remove the retaining clip or C-clip from the driveshaft.
Keep track of its orientation and position.
Never reuse damaged retaining hardware.
A retaining clip failure can allow the sealing assembly to move out of position.
Step 6: Remove The Stainless Ring And Carbon Ring
With the retaining hardware removed, the stainless sealing ring can be moved or removed according to the procedure for your particular model.
Remove the carbon ring and inspect both sealing faces.
Look closely for:
-
Grooves
-
Chips
-
Uneven wear
-
Heat damage
-
Pitting
This is also the time to inspect the driveshaft itself.
Step 7: Inspect The Driveshaft
Don't install a new seal onto a damaged driveshaft without investigating further.
Inspect for:
-
Corrosion
-
Grooves
-
Damaged splines
-
Excessive wear
-
Surface damage around seal components
Also inspect any accessible driveline components while everything is apart.
Step 8: Replace The Bellows If Required
Inspect the rubber bellows carefully.
If it's hardened, cracked, distorted or no longer provides adequate tension, replace it.
On an older ski, replacing the bellows together with the carbon ring is often worthwhile.
Make sure clamps are installed correctly and securely.
Step 9: Install The New Carbon Ring
Fit the replacement carbon ring in the correct orientation.
Keep the sealing face clean.
Avoid contaminating the mating surfaces with:
-
Grease
-
Dirt
-
Sand
-
Oil
The carbon ring and stainless ring need clean, properly aligned surfaces to seal correctly.
Step 10: Install The Stainless Ring
Install the stainless sealing ring and its O-rings or related components as specified for your model.
Inspect new O-rings before installation and lubricate only where the manufacturer's procedure specifies.
Compress the bellows sufficiently to expose the retaining groove.
Step 11: Install The Retaining Clip
Install the correct retaining clip into the driveshaft groove.
Before releasing the bellows, make absolutely certain the clip is fully seated.
Once secure, allow the stainless ring and carbon ring to return to their operating position.
The two sealing faces should sit squarely against each other.
Step 12: Reinstall The Jet Pump
Reinstall any components removed earlier.
Depending on the model, this may include:
-
Driveshaft
-
Jet pump
-
Steering linkage
-
Reverse linkage
-
iBR components
Use the correct torque specifications and assembly procedures from the workshop manual.
Don't guess critical fastener torque.
Step 13: Check The Seal Before Riding
Once everything is reassembled, inspect your work carefully.
Check that:
-
Carbon ring sits squarely
-
Stainless ring is secure
-
Retaining clip is correctly installed
-
Bellows isn't twisted
-
Clamps are secure
-
Driveshaft rotates correctly
-
All pump and steering components are reconnected
A mistake in this area can allow water into the hull.
Step 14: Perform A Careful Water Test
The final test should be performed in the water, because the carbon ring sealing system operates differently when the ski is floating than when it's sitting dry on the trailer.
After launching:
-
Keep the ski secured.
-
Remove the seat/access panel where safe.
-
Inspect the driveshaft area for water entry.
-
Start the engine.
-
Watch the carbon-ring area carefully.
-
Confirm there is no abnormal leakage.
Don't immediately head kilometres offshore after replacing a driveshaft seal.
Verify the repair first.
Don't Run A Carbon Ring Dry For Extended Periods
The carbon ring relies on water for cooling and lubrication during normal operation.
Running a Sea-Doo out of the water for excessive periods can generate heat at the sealing surfaces.
Follow Sea-Doo's procedure whenever operating the engine on the trailer.
What Causes Carbon Ring Failure?
Carbon rings are wear components, but several factors can accelerate failure:
-
Age
-
Damaged bellows
-
Poor alignment
-
Excessive dry running
-
Damaged stainless sealing surface
-
Driveshaft problems
-
Incorrect installation
-
Corrosion
-
Debris around the seal
Finding the underlying cause is particularly important if a recently replaced carbon ring fails prematurely.
Carbon Ring Or Something Else?
Water inside your Sea-Doo doesn't automatically mean the carbon ring has failed.
Other possible leak sources include:
-
Cooling hoses
-
Exhaust hoses
-
Hose clamps
-
Hull fittings
-
Drain plugs
-
Pump-related seals
-
Damaged hull components
Confirm the source before ordering parts.
Need A Sea-Doo Carbon Ring Kit?
Jet Ski Parts Warehouse stocks Sea-Doo driveline and jet pump components, including:
-
Carbon rings
-
Carbon seal kits
-
Stainless sealing rings
-
Rubber bellows
-
Driveshafts
-
O-rings
-
Retaining clips
-
Jet pumps
-
Bearings and seals
-
Genuine OEM parts
-
Premium aftermarket replacement parts
-
Quality used OEM components
If you're unsure which carbon ring or seal kit fits your Sea-Doo, contact JSPW with your model, year and OEM part number where available, and we'll help identify the correct components.
Final Thoughts
The Sea-Doo carbon ring is a relatively small component with a very important job.
If it begins leaking, ignoring the problem can result in increasing amounts of water entering the hull and potentially create much larger problems.
Look for water around the driveshaft, excessive carbon dust, worn sealing surfaces and deteriorated bellows.
When replacement is required, inspect the entire sealing assembly rather than just the carbon ring.
Install everything correctly, verify the retaining clip is properly seated and perform a controlled water test before returning to normal riding.
A little extra care during installation can be the difference between a dry hull and a very bad day on the water.